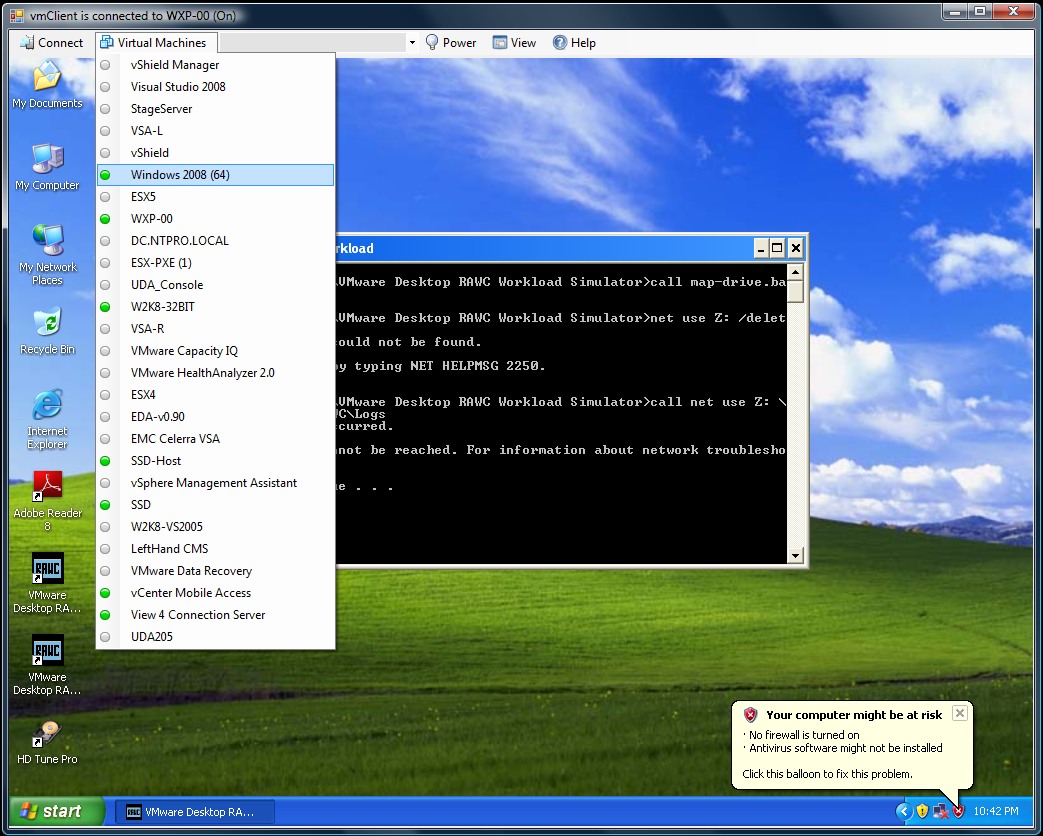
 The newly released vmClient 4.1 is vSphere 4.1 compatible. The vmClient is a lightweight tool which enables you to control the power of your virtual machines, it’s also capable of presenting the MKS console of your virtual machines. Before you can use the vmClient, you have to install the vSphere client on the same system. After starting the vmClient, you can logon to your vCenter server or individual ESX4.1 or ESX4.1i host. A list with available virtual machines will be presented after choosing the Virtual Machines menu item, you can also easily identify the power state of the virtual machines. Grey is powered off, green is powered on, yellow is suspended and red indicates that the virtual machine has an alarm. When you’re working in an RDP session there’s a menu item which can generate a Ctrl-Alt-Del in the guest OS instead of pressing Ctrl-Alt-Ins. The vmClient can run without borders in borderless mode. The menu bar has an option to search for virtual machines, just type in the first characters of your virtual machine name and the list will be filtered.
The number of virtual machines can be too high to fit in the “Virtual Machine” menu item so I’ve added an extra option to disable this menu and use the search menu instead. The option to customize the user interface of the vmClient can be done by changing a few menu settings. You’re able to show or hide menu items using the quick start configuration icon.
You can also pre-select a default virtual machine in these settings. There are two recorded demo sessions available, one which show a walkthrough and a second which shows how to convert the vmClient into a VDI client. The trail version is limited to a maximum number of 50 virtual machines and shows a splash screen with my picture in it. The registered version can be bought online for € 25,00 and has no virtual machine limit, you can not get rid of the splash screen. :-) The Buy Now link is available in the help menu. If you have any ideas or suggestions on improving the vmClient or you’ve found a bug, you know where to reach me. Have fun with it.
How to convert the vmClient into a VDI client
A general walkthrough
The vmClient 4.0 can be downloaded from this location: http://vmclient.nl/
Sunday, September 26. 2010
The vmClient 4.1 is released
Thursday, April 15. 2010
The vmClient - Just a handy tool or a cool lightweight VDI client?
 Recently I’ve added a few new features to the vmClient which enables you to customize the visibility of menus. Because all those new settings could only be changed be editing the registry, I’ve decided to add a configuration dialog. When the vmClient is running, there’s a notification icon visible near your Windows clock in the right lower corner. You have to double click the icon in order to change te vmClient configuration settings. Within the config dialog, there’s an option to enable or disable auto logon and the preferred virtual machine setting. There’s also a tab for configuring your favourites and show or hide individual menu items. The cool feature in this release is... hide all menus, use auto logon and configure a preselected VM and voila there’s you lightweight VDI client.
![]()
The download is available at http://vmClient.nl
![]()
Tuesday, March 9. 2010
The vmClient 4.0 is released
The vmClient is a lightweight tool which enables you to control the power of your virtual machines, it’s also capable of presenting the MKS console of your virtual machines. Before you can use the vmClient, you have to install the vSphere client on the same system. After starting the vmClient, you can logon to your vCenter server or individual ESX4 or ESX4i host. A list with available virtual machines will be presented after choosing the Virtual Machines menu item, you can also easily identify the power state of the virtual machines. Grey is powered off, green is powered on, yellow is suspended and red indicates that the virtual machine has an alarm. When you’re working in an RDP session there’s a menu item which can generate a Ctrl-Alt-Del in the guest OS instead of pressing Ctrl-Alt-Ins. The vmClient can run without borders in borderless mode. The menu bar has an option to search for virtual machines, just type in the first characters of your virtual machine name and the list will be filtered.
The number of virtual machines can be too high to fit in the “Virtual Machine” menu item so I’ve added an extra option to disable this menu and use the search menu instead. The option to customize the user interface of the vmClient can be done by changing a few registry settings. You’re able to show or hide menu items using this hive.
HKEY_CURRENT_USER\Software\VB and VBA Program Settings\NTPRO.NL\vmClient
You can also pre-select a default virtual machine in this hive. There are two recorded demo sessions available, one which show a walkthrough and a second which shows how to convert the vmClient into a VDI client. The trail version is limited to a maximum number of 50 virtual machines and shows a splash screen with my picture in it. The registered version can be bought online and has no virtual machine limit, you can also get rid of the splash screen. :-) The Buy Now link is available in the help menu. If you have any ideas or suggestions on improving the vmClient or you’ve found a bug, you know where to reach me. Have fun with it.
How to convert the vmClient into a VDI client
The vmClient 4.0 can be downloaded from this location: http://vmclient.nl/
Tuesday, March 2. 2010
Eric Sloof's Cool Tool - vmClient - Sneak Preview
I’ve been busy with coding the past few days. I’ve successfully completed my Microsoft Partnership admission and received a subscription to their developer network. Now I’ve access to all the developer tools an operating systems you can dream of. My coding project has to do with a project I started a few years ago, I’ve written a little cool tool called the Virtual Machine MKS Client. Eventually it ended up in some sort of a contest with Bouke Groenescheij and Richard Garsthagen when Bouke and I did a freelance job at Ahrend, we had some real fun and long channel walks. Since the training business is a bit sloppy this month I’m trying to revive the tool and make it vSphere compatible. I started with converting it to Visual Studio 2008 and had to rebuild some DLL’s. I endured some real challenges with VMware’s new activeX (VNC) object but finally I got it to work. Here’s a Jing movie with a sneak preview, it will take at least another week to make the beta publicly available.
http://www.screencast.com/users/esloof/folders/Jing/media/dcf472ed-d268-4ffb-94d4-20ebc3f44de0
Saturday, January 9. 2010
Creating LinkedClones with the Virtualization EcoShell
When you’re running a Virtual Machine in a production environment and want to perform some tests on it but don’t have enough time or space on your Datastores to create a full hot clone, there’s an alternative.
vSphere 4.0 supports linked virtual machines, which are two or more virtual machines that share storage. Linked virtual machines support efficient sharing of duplicated data. In its simplest form, shared storage is achieved through the use of delta disk backings. A delta disk backing is a virtual disk file that sits on top of a standard virtual disk backing file. Each time the guest operating system on a virtual machine writes to disk, the data is written to the delta disk.
Each time the guest operating system on a virtual machine reads from disk, the virtual machine first targets the disk block in the delta disk. If the data is not on the delta disk, the virtual machine looks for them on the base disk.
Linked virtual machines can be created from a snapshot or from the current running point. After you create a virtual machine, they share the base disk backing and each virtual machine has its own delta disk backing. You can have up to eight virtual machines in a linked virtual machine group. The virtual machines in the group cannot be part of a VMware HA cluster.
Hal Rottenberg is the author of the New-LinkedClone.ps1 PowerShell script, it’s adapted from a technique published originally by Keshav Attrey. Also see William Lam's Perl script and Leo's manual version for ESX 3.5 but I believe, back in 2007 I was one of the first to discover this technique.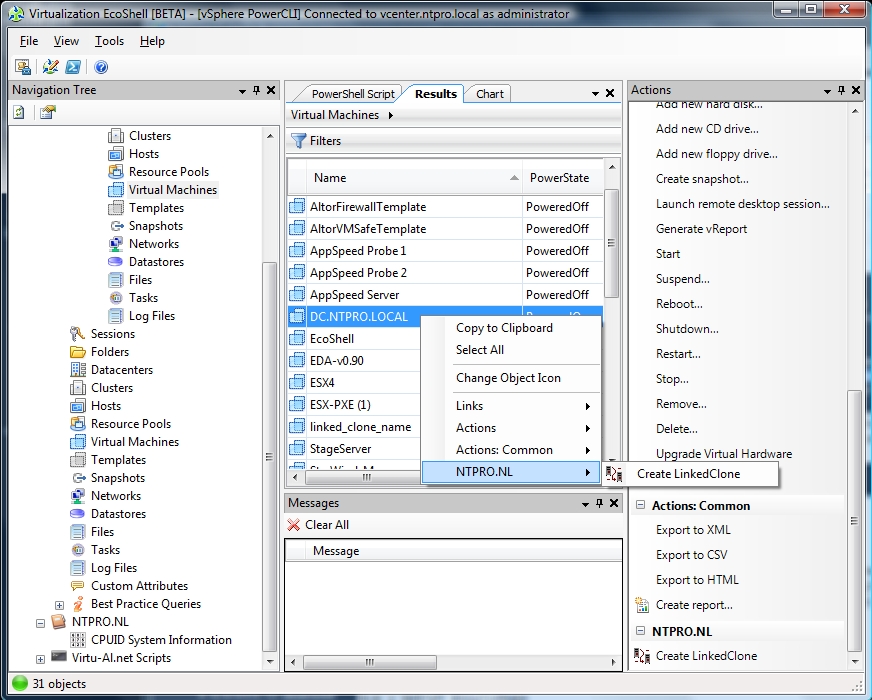 I’ve made some little modifications in Hal’s script and added it as a Script Action to the Virtualization EcoShell by clicking “Add new item” in the actions menu on the right side of the EcoShell console. This enables you to specify a script performing the Action. When you click an Action, objects currently selected in the grid are piped into the script. The LinkedClones Script Action is part of the newest version (1.08) of the NTPRO.NL PowerPack, you can get a copy here. The screen shot shows you how it works.
Update: Alan Renouf has emailed me a link to an interesting knowledge base article regarding Virtual machines from a single disk chain may only run on 8 hosts (VMFS).
Sunday, January 3. 2010
CPUID System Information
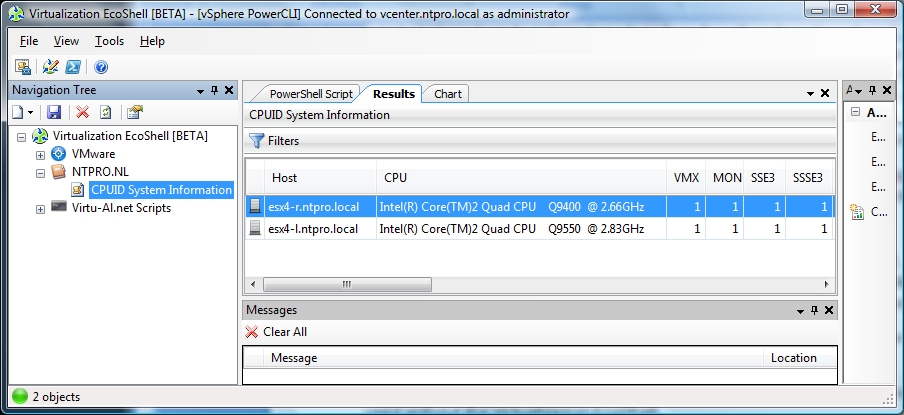
I’ve created a new Virtualization EcoShell PowerPack with only one Script Node and it’s called “CPUID System Information“ which shows the VMHost CPU Info. The inspiration for building this new PowerPack came from VMware’s evangelist Richard Garsthagen who has built the well known Visual Basic Application, VMware CPU Host Info. “CPUID System Information” is completely based on PowerShell and VMware’s PowerCLI. The script is able to show you which features (CPUIDs) are available on your ESX server’s CPUs. Besides checking VMotion compatibility it also shows you:
- Enhanced VMotion Compatibility (EVC) levels which simplifies VMotion compatibility issues across CPU generations. EVC automatically configures server CPUs with Intel FlexMigration or AMD-V Extended Migration technologies to be compatible with older servers.
- All the important CPU features like: VMX, MONITOR/MWAIT , SSE3, SSSE3 ,SSE4.1 ,SSE4.2 ,CMPXCHG8B ,CMPXCHG16B ,NX/XD ,Long mode support ,RDTSCP ,3DNow! ,3DNow! Extensions ,FFXSR ,Prefetch instructions.
I’ve three versions available for download.
The first one can be used as a PowerPack in the Virtualization EcoShell.
http://www.ntpro.nl/blog/uploads/NTPRO.NL.powerpack
Thursday, October 29. 2009
VESI PowerPack Authoring
I created my first VESI PowerPack with a little help from Alan Renouf, Darin Pendergraft and Carter Shanklin. Before I’m going to show off, first let’s explain what a PowerPack actually is.
A PowerPack is a collection of PowerShell scripts that are used to extend the Virtualization EcoShell administrative console. These scripts are stored inside of nodes, links or actions all of which are used to add functionality into the console. 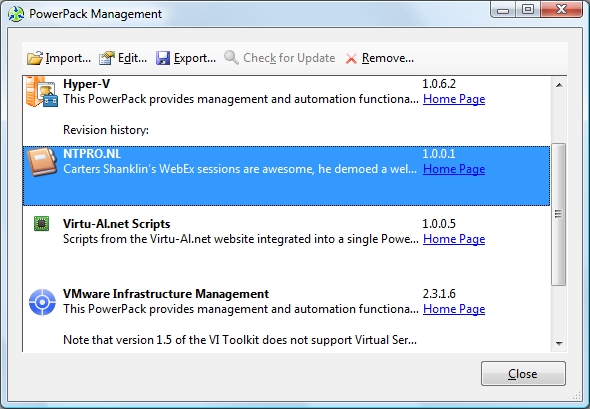
Carters Shanklin’s WebEx sessions are awesome, he demoed a well written series of PowerShell scripts. With one of his scripts you’re able to collect the %RDY time statistics for all your Virtual Machines. The most common cause of high ready time is trying to get too much work out of too little hardware. Often this condition is observable when ready time is high and total host CPU utilization is also very high. The only fix for this is to back off the load on the system. VMs should be migrated off or processor resources should be increased. I combined Carter’s script with a new feature in the Virtualization EcoShell and created my first PowerPack. 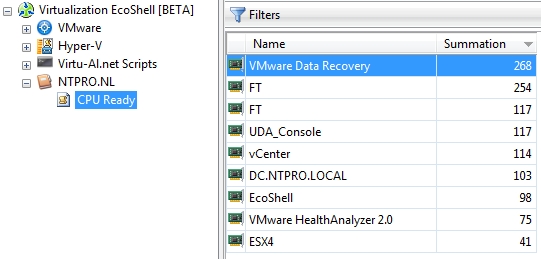
If you’re interested in creating your own PowerPack take a look at the “PowerGUI Basic PowerPack Authoring” created by Darin Pendergraft. Also keep an eye on Alan Renouf’s website http://www.virtu-al.net/ , he’s going to launch a real cool VESI PowerPack with all his PowerShell scripts, I’ve received the beta and it already looks impressive.
Here's my PowerPack: http://www.ntpro.nl/blog/uploads/NTPRO.NL.powerpack
Tuesday, May 5. 2009
Virtual Machine Blue Screen detector
I recently posted an article about capturing screenshots of virtual machines. The PowerShell code is based on VMware’s PowerCLI and the VI Toolkit Extensions. The user interface was created with Sapien’s free PrimalForms. I received a lot of comments asking me if this script could be of any practical use in a production environment, and I must admit I had some thoughts about it too. This morning I received a real cool PowerShell script from Carter Shanklin, VMware’s Product Manager, End User Enablement. His script is able to run a screenshot through OCR and extract anything interesting from it.
Optical Character Recognition (OCR) extracts text and layout information from document images. With the help of Microsoft Office Document Imaging Library (MODI), which is contained in the Office 2003 and 2007 package, you can easily integrate OCR functionality into your own applications. In combination with the MODI Document Viewer control, you will have complete OCR support with only a few lines of code.

In the image you see the "Virtual Machine Blue Screen Detector" in action, first it captures a screenshot of a virtual machine. Secondly it uses the Toolkit Extensions to copy it to the local drive. When the PNG image is saved on the local drive, it’s converted to TIFF. The TIFF image will be used to extract the text using OCR.
Now, how can we create a blue screen? We could use this utility, “StartBlueScreen.exe” just as it sounds, allows you to crash the Windows operating system by initiating a Blue Screen of Death according to 5 parameters that you specify from command-line. StartBlueScreen.exe loads a very small device driver named NirSoftBlueScreenDriver.sys that calls the crash API function of Windows Kernel (KeBugCheckEx) with the 5 crash parameters that you specify in the command-line.
You can get your copy of the Virtual Machine Blue Screen Detector here.
Update : Luc Dekens (@LucD22) Great script, nice how it brings different features together. Now could you make it read out the BSOD ? ;-) Sure Luc, here you go.
Monday, May 4. 2009
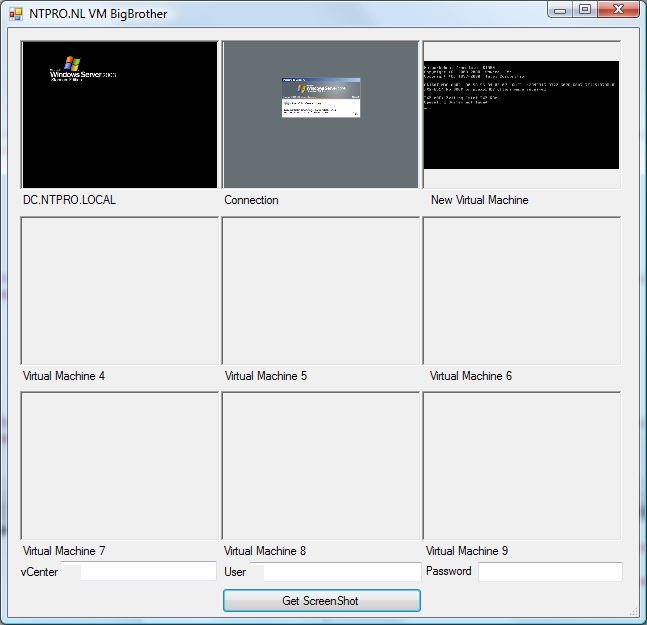
Big Brother Really Is Watching
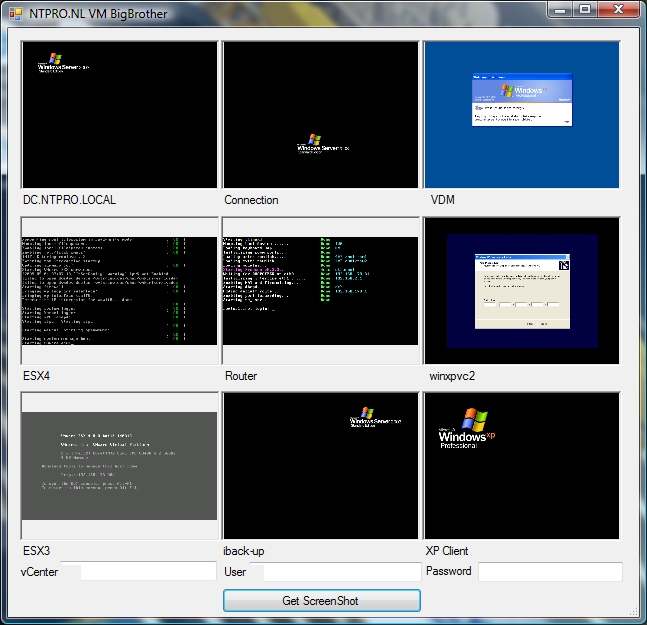
VMware ESX4 and the new vCenter server both offer a lot of new SDK properties and methods. One of the new methods is CreateScreenshot_Task which is part of the ManagedObjectReference:VirtualMachine. This method creates a screenshot of the virtual machine console, the image is saved as a portable network graphics (.png) file in the virtual machine folder. This features is normally used by HA Virtual Machine Monitoring. The Virtual Machine Monitoring feature uses the heartbeat information that VMware Tools captures as a proxy for guest operating system availability. This allows VMware HA automatically to reset or restart individual virtual machines that have lost their ability to heartbeat. Before resetting or restarting the Virtual Machine the vCenter server creates a snapshot of a possible BSOD. I created a PowerShell script which initiates and copies the screenshots of 9 Virtual Machines. The screenshots are presented in a user interface constructed with Sapien's free PrimalForms. The PowerShell code is still rough and can be improved dramatically.
Monday, March 2. 2009
New version Resource Pool Reservation Script released
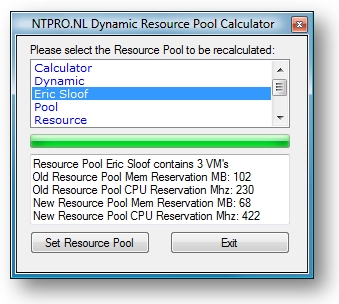
Rob Mokkink released an updated version of the Resource Pool Reservation Script. This script is based on my Resource Pool Calculator. He modified it quite a bit. It now has logging, can be run as a scheduled task, % of resource reservation for memory and CPU that can be set on a resource pool. The script respects the reservation set on a particular VM.
The Dynamic Resource Pool Calculator recalculates all your resource pools. Depending on the number of virtual machines per resource pool, the number of reservations for memory and CPU is automatically lifted after running the Dynamic Resource Pool Calculator. The script also respects the existing individual virtual machine reservations and adds those value’s to the total RP sum.

